JavaScript Basics
Color the World
JavaScript is designed to work tightly with HTML/CSS. Many of the built-in functions in JS are designed to directly access parts of a web page.
Let's look at a few of the basic commands to get us started. First, let's look at how JS and HTMl work together. Create a new HTML file and set up the basic structure of the page as normal. Something like this:
<!DOCTYPE html>
<html lang="en">
<head>
    <meta charset="UTF-8">
    <title></title>
</head>
<body>

</body>
</html>
For future reference, whenever creating a new file, this text will often assume that you are using a basic HTML template including doctype declaration, <head>, <body>, and typical meta tags.
Now, you can change the color of the page by simply adding a style attribute to your <body> tag. But instead, let's create a <script> in the body and use a little JS.
<script>
    document.body.style.background = "DarkRed";
</script>
Add some content if you wish, and then open the file in your web browser. The background will be standard green. Let's break it down. JS has a set of built-in variables that are linked to many parts of a web page. They allow us to assign values to those variables giving us the ability to manipulate those parts of the web page.
In this case, we are selecting document.body.style.background. Notice that each name is separated by a period (.) and becomes more specific each time. So here, JS selects the whole document, and then just the body, and then the body's style, and finally, the background. You have to work your way down to individual document elements in this way. But once you get used to it, it's pretty easy. There's no funny syntax, no weird names, just plain English words.
After the element selection, we use an equal sign (=) and, in quotation marks, the name of a color, in this case, "DarkRed". And then, we terminate the line with a semicolon (;). And that's it. A script that changes the background color of the web page.
It's probably a good idea to mention that this is actually a pretty heavy-weight way of changing the background color. JS takes up a fair bit more proccessor overhead (not that you're likely to notice it in this case) than simply using an HTML style or CSS. However, there are many times that you might want to do this dynamically in JS as opposed to statically in HTML/CSS, but for now, it's enough to know that it can be done.
The <input> Element
Before we look at more JS, let's quickly look at the <input> tag. One of the ways that we can add interactivity to web pages is by using <input> elements, which can be used to create all sorts of re-usable and customizable widgets like buttons, text boxes, and checkboxes. Let's look at a simple button example.
Create a simple blank web page and add the following element to it:
<input type="button" value="Press me!" />
Open the web page in your browser and observe the results.
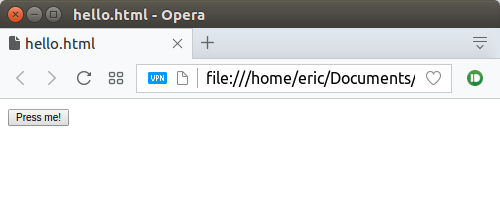
The button doesn't do much, but it's a start. The <input> tag in this example has two attributes, type and value. The type tells the browser that this element is a button and the value attribute sets the text in the button.
Let's make a button that actually does something.
Inline JavaScript
For the rest of this section, we will be looking at the basic JavaScript demos found on the demo page: itech190.erickuha.com.
Example 1
This is the source code:
<!DOCTYPE html>
<html lang="en">
<head>
    <meta charset="UTF-8">
    <title>Mystery Image</title>
</head>
<body>
    <div style="text-align: center;">

        <img src="question-mark.png" alt="Question Mark"
                onmouseover="this.src='raccoon.png';"
                onmouseout="this.src='question-mark.png';"
                />
        <p>
        Mouse over the question mark to reveal the image
        </p>
    </div>
</body>
</html>
The body of the web page consists of a <div> tag that only serves to center our content. Inside the <div> is an image tag. Now, look carefully at the attributes that we've assigned to this image tag. The src is initially set to "question-mark.png" which is an image that must be in the same folder as the web page. The alt attribute is just the alternate text if the image fails to load. Then we have two new attributes, onmouseover and onmouseout. The values assigned to these two attributes are JavaScript!
In onmouseover we assign the line of JS code: this.src='raccoon.png;. Notice that in the page, the entire line of JS is enclosed in double quotes ("). This is important syntax and must not be left out. But strip all of that away, and we can examine the JS closely. The this keyword in JS is a special variable that refers to "this" object. In this case, since its being referenced inside of a <img> tag, this refers to the <img> tag itself. this.src therefore is a way of grabbing the src attribute of the <img> tag. Next, we use the equal sign (=) to assign a the value 'raccoon.jpg' to the src attribute.
The onmouseout attribute simply re-sets the src attribute to 'question-mark.png'. The code is nearly identical.
It is important to pause here and talk about the equal sign. In JavaScript (and the vast majority of other programming languages), the equal sign does not work the same way that it does in algebra. In algebra, it is the symbol which tells us that two things are equal, and it is the important symbol in an equation. For example, in the equation 2x + 1 = 5, we know that x = 5 because it's the only number that makes the equation true. However, in programming, the equal sign is not an assertion of equality, it is actually an operator. Specifically, it is the assignment operator. We use the assignment operator whenever we want to store some value inside of a container, such as when we want to assign the name of an image file to some container (called a variable), like this.src in an <img> tag. To reiterate, in algebra, the equal sign is an assertion of equality. In JS, the assignment operator is an action storing a value in a variable. From this point onward, we will always refer to the equal sign symbol as the assignment operator. In later sections, we'll talk more about its use.
Example 2
<!DOCTYPE html>
<html lang="en">
<head>
    <meta charset="UTF-8">
    <title>Mystery Image</title>
</head>
<body>
    <div style="text-align: center;">

        <img src="question-mark.png" alt="Question Mark"
                onclick="this.src='raccoon.png';"
                />
        <p>
       Click the question mark to reveal the image.
        </p>
    </div>
</body>
</html>
In this example, we look at the onclick attribute. Like onmouseover and onmouseout, this attribute can be added to most html elements. Instead of waiting for the mouse pointer to enter the element, however, it waits for the user to click on the element. In this case, when the user clicks on the question mark image, it changes to the raccoon image. Unlike the previous example, it does not change back.
Example 3
<!DOCTYPE html>
<html lang="en">
<head>
    <meta charset="UTF-8">
    <title>Mystery Image</title>
</head>
<body>
    <div style="text-align: center;">
        <img id="question" src="question-mark.png" />
        <p>
        <input type="button" value="Show Image"
               onclick="document.getElementById('question').src='raccoon.png';" />
        <input type="button" value="Hide Image"
               onclick="document.getElementById('question').src='question-mark.png';" />
        </p>
    </div>
</body>
</html>
In this example, the main difference is that we are using two buttons to swap out the image. Clicking the "Show Image" button causes the image to switch to the raccoon. Clicking the "Hide Image" button changes it back to the question mark.